Khadas VIM4 - Powerful Mobile Setup with iPad Pro
In this video we'll dig into the specs and features of the Khadas VIM4 and we'll see a full setup guide for using the VIM4 as a mobile companion with your iPad or Android tablet.
Booting into OOWOW
To install an OS on to your VIM4, first boot into the embedded OOWOW OS. New units will boot into OOWOW automatically. If you've already installled an OS and want to boot into OOWOW again, hold the Function button (the middle one), quick press Reset (the button closest to the USB ports), and then release Function.
After booting OOWOW, you can connect a monitor and keyboard, or you can connect to the VIM4 hotspot and access OOWOW through the browser. To toggle the hotspot, short press the Function button, then connect to the vim4-xxxx hotspot on your computer:
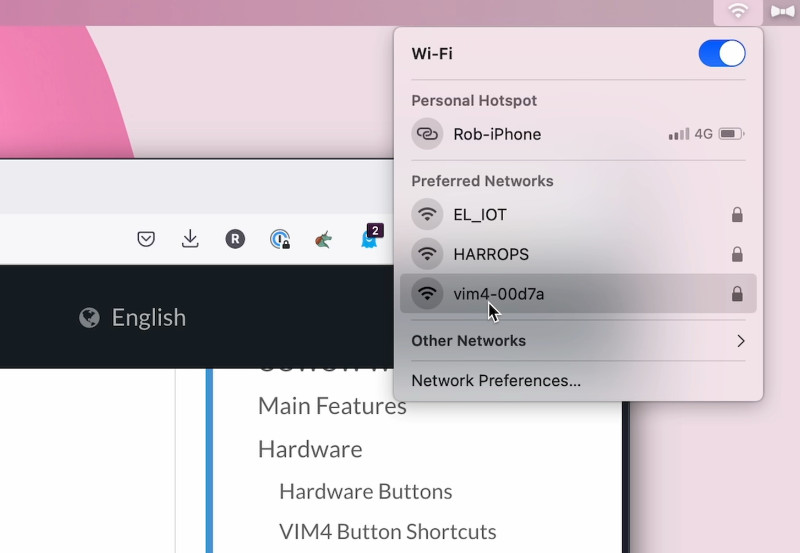
Once connected, you must press the Power button to accept the connection. After the connection is connected connect to http://oowow.
Installing Ubuntu
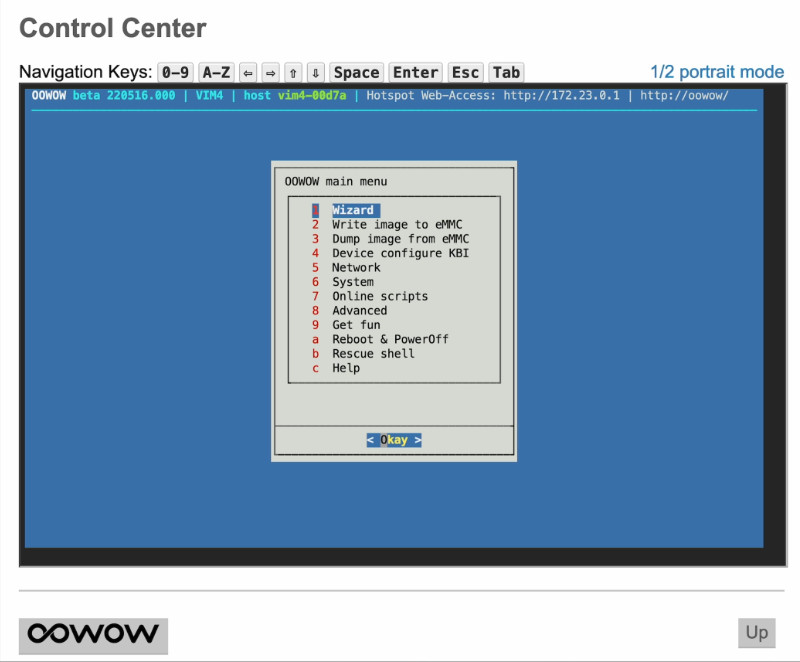
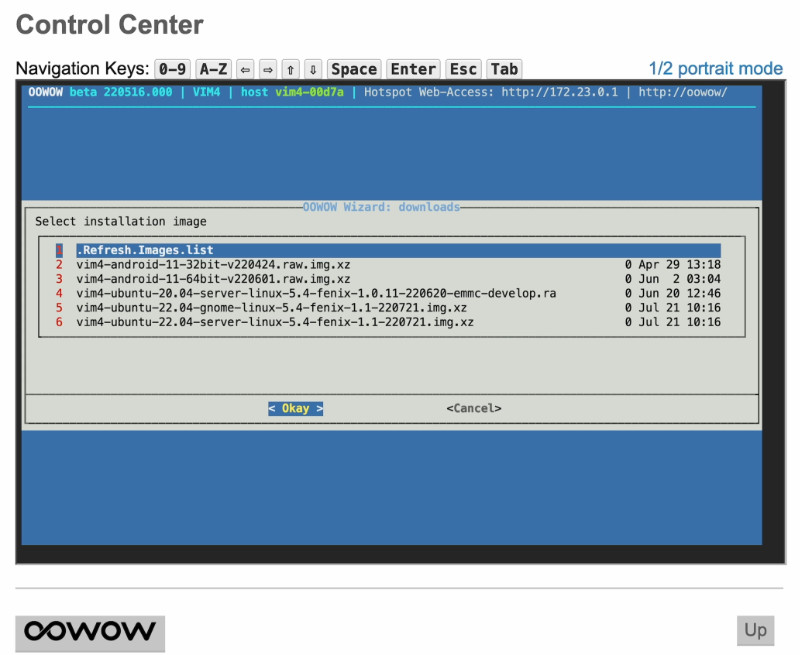
Once connected, choose Control Center, then Wizard and follow the on-screen steps, picking the image that's right for you. In the video we used the Ubuntu 22.04 with GNOME.
Installing Ubuntu is simply a matter of following the wizard steps and then rebooting when prompted. Very easy.
Connecting over SSH
Once the VIM4 reboots it will accessible over SSH at khadas@khadas.local with default password: khadas.
You might want to take the opportunity to update the package catalog and upgrade all your packages with:
sudo apt update && sudo apt upgrade -yConfiguring TigerVNC
We'll use TigerVNC to provide a remote desktop that we'll connect to from our tablet or laptop.
Start by installing TigerVNC:
sudo apt install tigervnc-standalone-serverOnce that's installed, create a VNC password with the vncpasswd command. You don't need to create a view-only password unless you really want to.
Now edit /etc/tigervnc/vncserver.users and add :2=khadas at the end of the file. The khadas here is the name of your user, if you create a different user account, be sure to use that username instead.
To start TigerVNC run sudo systemctl start tigervncserver@:2. To auto-start TigerVNC at startup time use sudo systemctl enable tigervncserver@:2.
SSH Tunnelling
By default, TigerVNC doesn't accept connections from remote machines. Instead, it expects you to create an SSH tunnel to the machine and access VNC that way. On iOS and Android your VNC client will probably have SSH tunnelling as a built-in feature. For example, I use Jump Desktop where tunelling is a first-class feature.
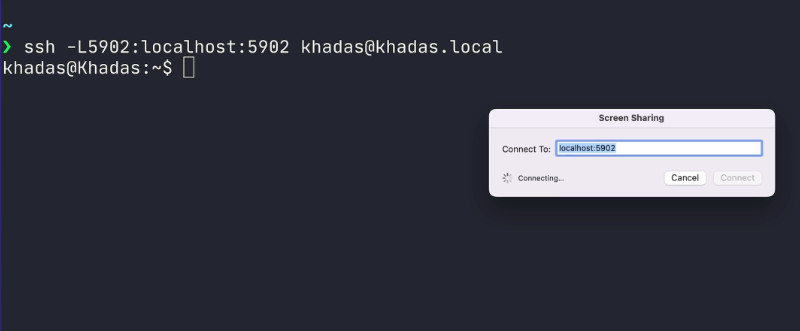
If you're on Mac, Windows or Linux and want to create a tunnel, you can do this with ssh:
ssh -L5902:localhost:5902 khadas@khadas.localThis tunnels port 5902 on the local machine to 5902 on khadas.local.
Connecting to VNC
Once your SSH tunnel is configured, you connect to VNC using localhost:5902 and not khadas.local:5902. Enter your VNC password when prompted.
Enabling the WiFi Hotspot
Since the VIM4 has two wifi adapters, the best way to connect to it from your tablet is to make one of those adapters act as a hotspot. To do this run:
sudo nmcli dev wifi hotspot ifname wlan1 ssid vimpad password vimpad123 band bgThis makes wlan1 the hotspot interface. I use wlan0 to connect the VIM4 to WiFi for Internet access. Feel free to switch this around if you prefer.
The network name or ssid is set to vimpad, but you can change that to a name that makes sense for you.
To have the Hotspot activate automatically when the VIM4 starts run:
sudo nmcli con modify Hotspot connection.autoconnect trueEnabling WiFi Scanning
Within the VNC session you'll notice that you can't connect the VIM4 to a WiFi network - the default configuration forbids it.
To fix this, create /etc/polkit-1/localauthority/50-local.d/wifi-scan.pkla with this content:
[Allow Wifi Scan]
Identity=unix-user:*
Action=org.freedesktop.NetworkManager.wifi.scan;org.freedesktop.NetworkManager.enable-disable-wifi;org.freedesktop.NetworkManager.settings.modify.own;org.freedesktop.NetworkManager.settings.modify.system;org.freedesktop.NetworkManager.network-control
ResultAny=yes
ResultInactive=yes
ResultActive=yes
You may need to restart for this to take effect, but with this policy applied you're now able to scan for and connect to WiFi networks within your VNC session.
Network Connection Sharing
When the VIM4 is connected to the Internet over one of its Wifi adapters and a device - like an iPad or Android tablet - is connected to the hotspot running on the other Wifi adapter, that connected device will share the VIM4's Internet connection without any extra configuration.